What is a React APP?
A React app is a web application built using the React JavaScript library, which is designed to create user interfaces (UIs) for websites. React follows a component-based architecture, where the application is divided into reusable components that encapsulate specific functionality and render a part of the UI. These components can be nested within each other to create a hierarchical structure, allowing developers to build complex UIs efficiently.
There are a lot of people who get confused about the fact that how to deploy a react app on Cpanel which has numerous challenges due to environmental differences a react App needs to run. Lots of tutorials sometimes do not work as expected, however, this article will provide you with a lot of insight on how to deploy a react app on Cpanel shared hosting environment.
Overall, React has gained immense popularity among developers due to its simplicity, reusability, and performance optimizations. It is widely used for building interactive, responsive, and scalable web applications, making it a powerful tool in modern web development. In this article, You will also be able to know about the challenges to deploy a react App on cpanel.
Deploying a React app in a shared hosting environment can present certain challenges due to the limitations and configurations typically associated with such hosting environments. Here are some difficulties you may encounter:
- Build Process: React apps need to be built before deployment, generating static HTML, CSS, and JavaScript files. Shared hosting environments often have restrictions on running build processes or custom server configurations. This can make it difficult to set up an automated build process, and you may need to manually build the app locally and upload the generated files.
- Server-Side Rendering (SSR): React apps can be server-side rendered for better performance and SEO. However, shared hosting environments may not support SSR or have the necessary server configurations in place. This means you may need to rely solely on client-side rendering, which could impact initial load times and SEO.
- Routing and URL Rewrites: React apps typically use client-side routing for navigating between pages. Shared hosting environments may not support URL rewriting rules or have limitations on configuring them. You may need to use hash-based URLs instead of clean URLs, affecting the user experience and potentially SEO.
- Required Dependencies and Server Configurations: React apps have specific dependencies and server configurations. Shared hosting environments may have limited support for installing required dependencies or modifying server configurations. You may need to rely on the hosting provider’s pre-installed dependencies and server settings, which could limit your flexibility or compatibility with certain React features.
- Scalability and Performance: Shared hosting environments are designed to host small-scale websites, and they may not provide the necessary resources or performance optimizations for a React app with high traffic or resource-intensive features. This can result in slower load times or limited scalability as your app grows.
To mitigate these difficulties, you may consider alternative hosting options like cloud hosting or Platform-as-a-Service (PaaS) providers that offer better support for deploying React apps. These hosting solutions usually provide more flexibility, scalability, and better compatibility with React-specific requirements.
But you want to deploy a react app in shared hosting, take no worries. In this tutorial, we will walk you through the process of deploying a React.js application on cPanel shared hosting. Although cPanel is primarily designed for hosting static websites, with a few modifications and tricks, we can successfully deploy a React.js app on it. So let’s get started!
Step 1: Create a Production Build
React is a JavaScript library which created and released by Facebook, React is also called as User Interface (UI) library too, React is a tool which used for building UI components for your Website Design
Before we proceed, ensure that you have a React.js app ready for deployment. If you haven’t built your application yet, follow these steps:
- Install Node.js and npm on your local machine if you haven’t already.
- Open your terminal or command prompt and navigate to your project directory.
- Run the command:
npm run build - This will generate a production-ready build of your React.js app in the “build or dist” directory.
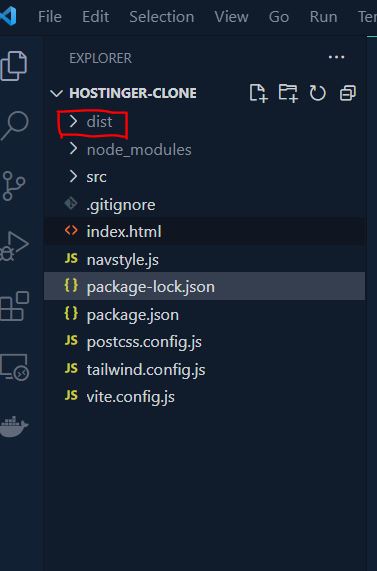
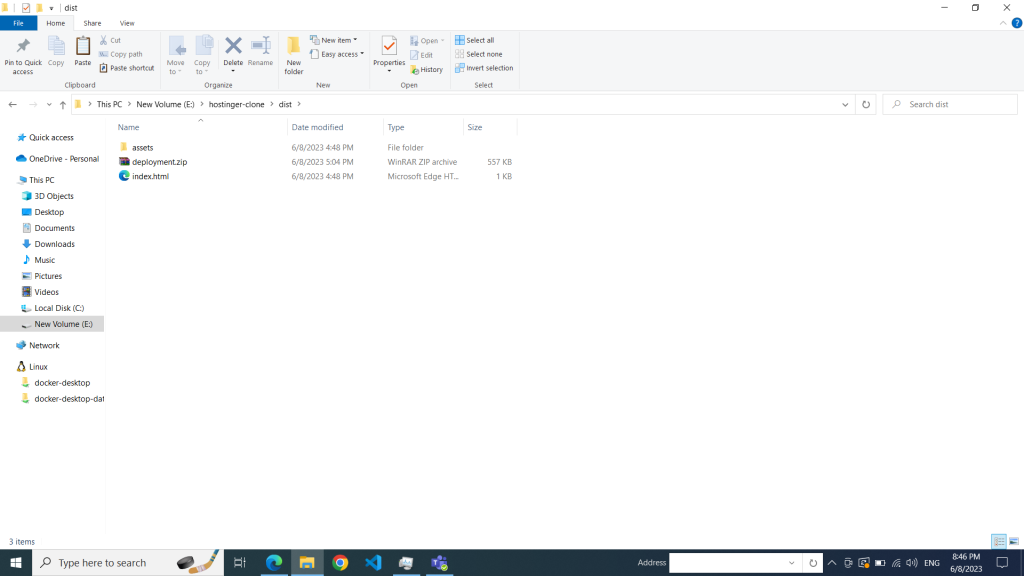
The build folder is essentially a super-compressed version of your program that has everything your browser needs to identify and run your app.
go to your build or dist folder. Select all of your file and compress them into a zip file.
Step 2: Prepare Your cPanel Account
To deploy your React.js app on cPanel, you need to perform the following preparations:
- Access your cPanel account.
- Set up a new subdomain or use an existing one for your React app. For example, “react.yourdomain.com”.
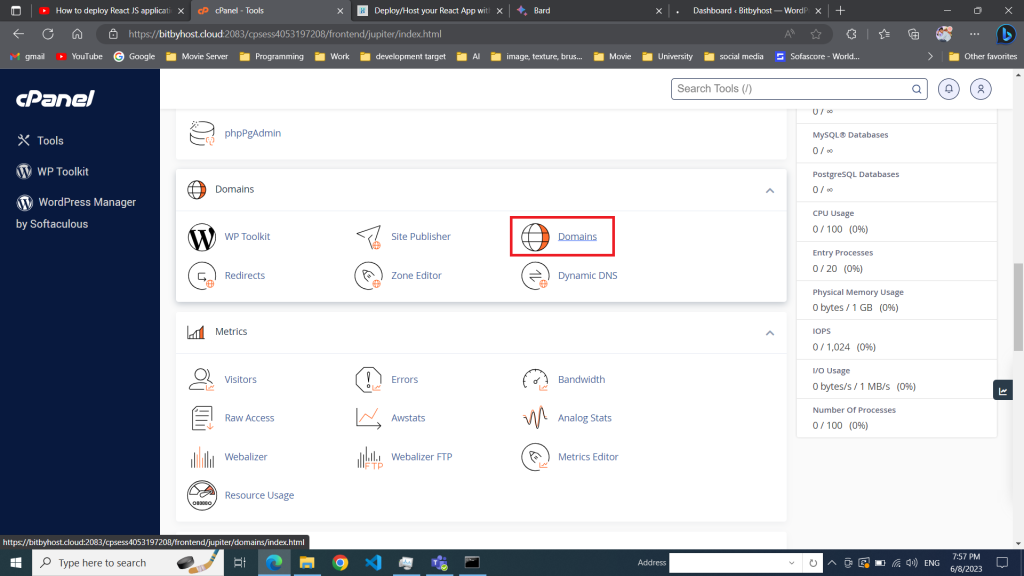
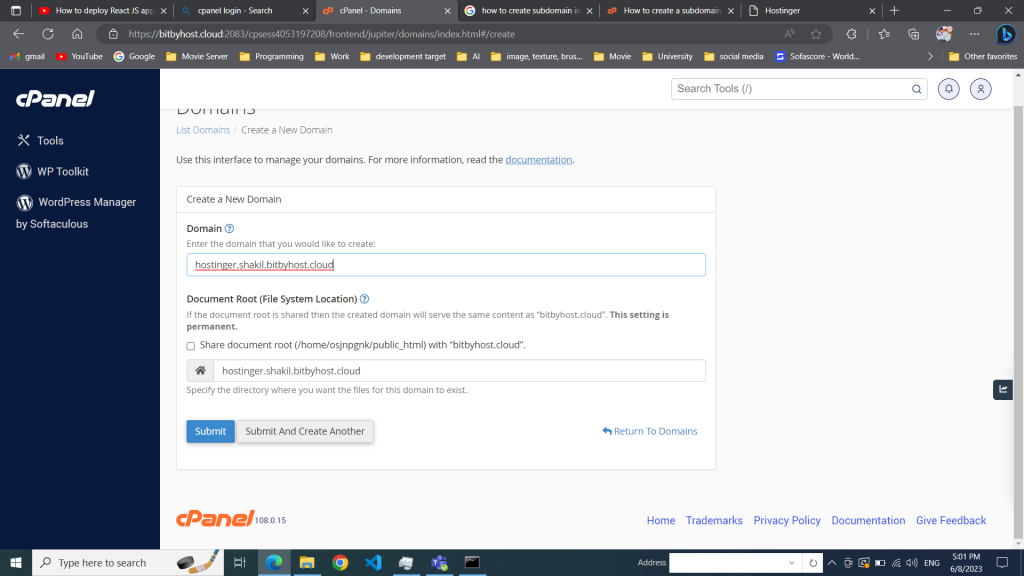
To create a subdomain. Go to your cPanel account. Find domains section Click “Domains” under the “Domains” section.
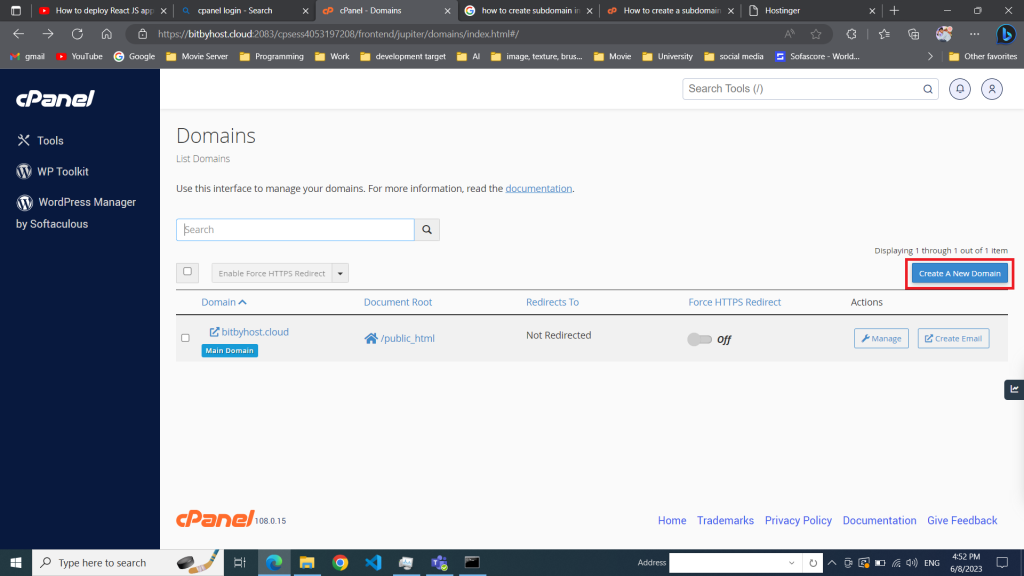
Click the “Create A New Domain” button.
Enter the subdomain name to add in the “Domain” text box.
Deselect the “Share document root (/home/username/public_html) with “domain.tld”.” option.
Enter the directory where you want the files for this subdomain to exist.
Click the “Submit” button.
Step 3: Upload Your React.js App to cPanel
Now, let’s upload your React.js app to cPanel
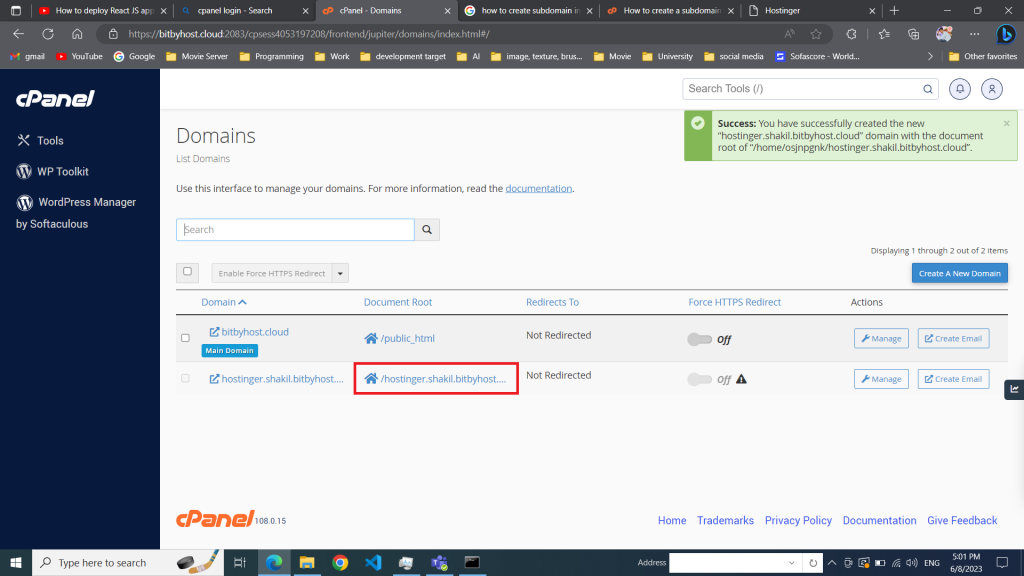
After submit the subdomain name you will see your newly created subdomain in domain list.
now click on document root to navigate root folder
it will redirects you to a new tab with cPanel file manager where you will see your subdomain root folder and click on it. After clicking the folder the folder should be empty.
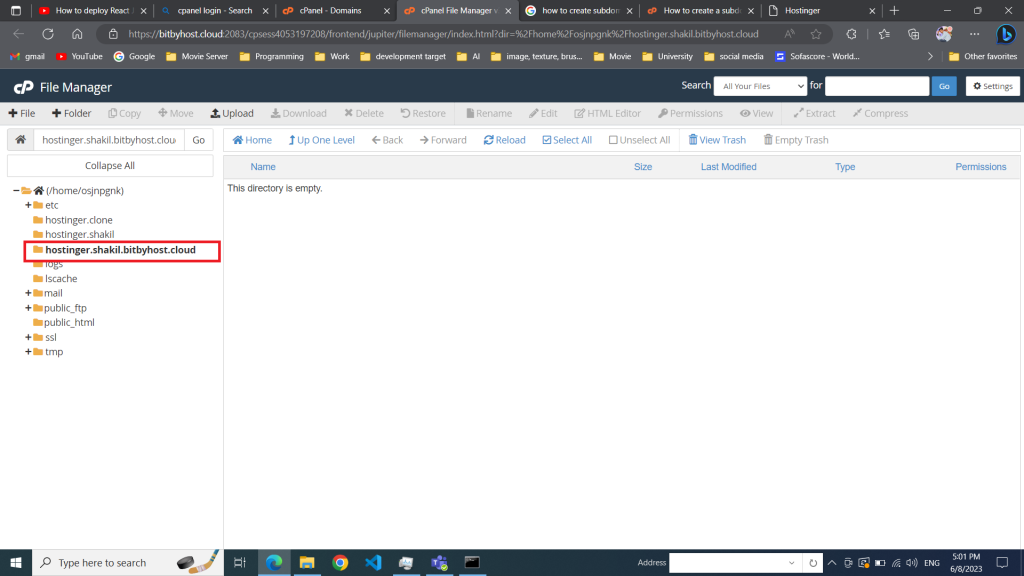
on top bar you will see a upload button. click on it and it will redirect you to a new tab where you can upload your react js file.
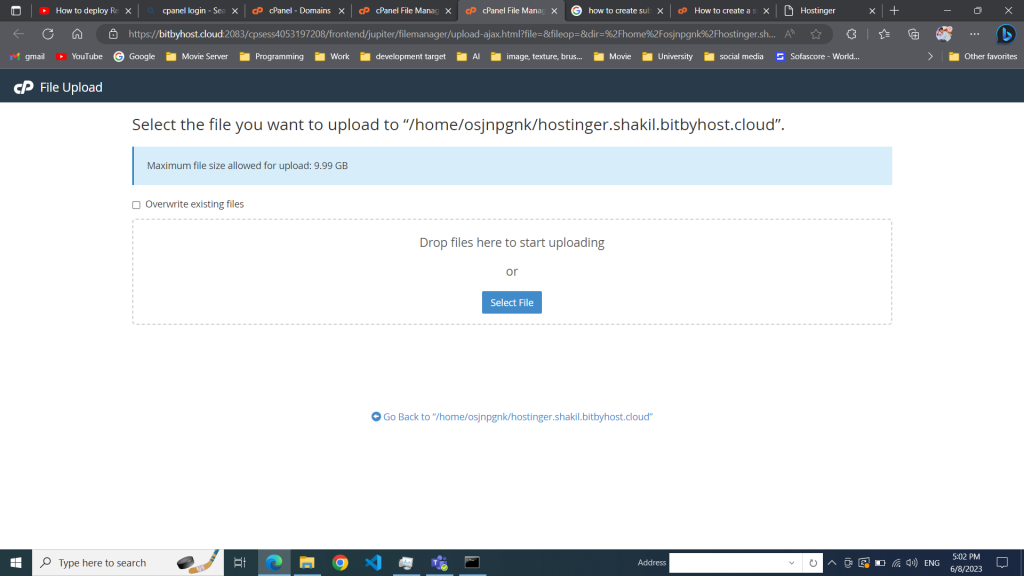
Upload your zip file from build or dist folder what you have created little earlier.
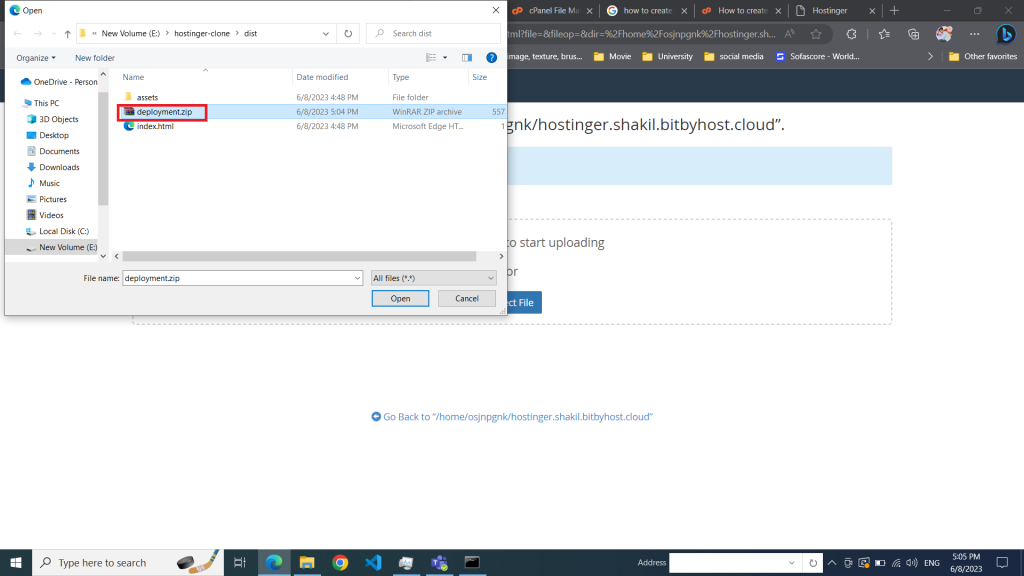
After uploading 100% go to cPanel file manager tab and click on refresh button.
You will see uploaded zip file there and extract the file
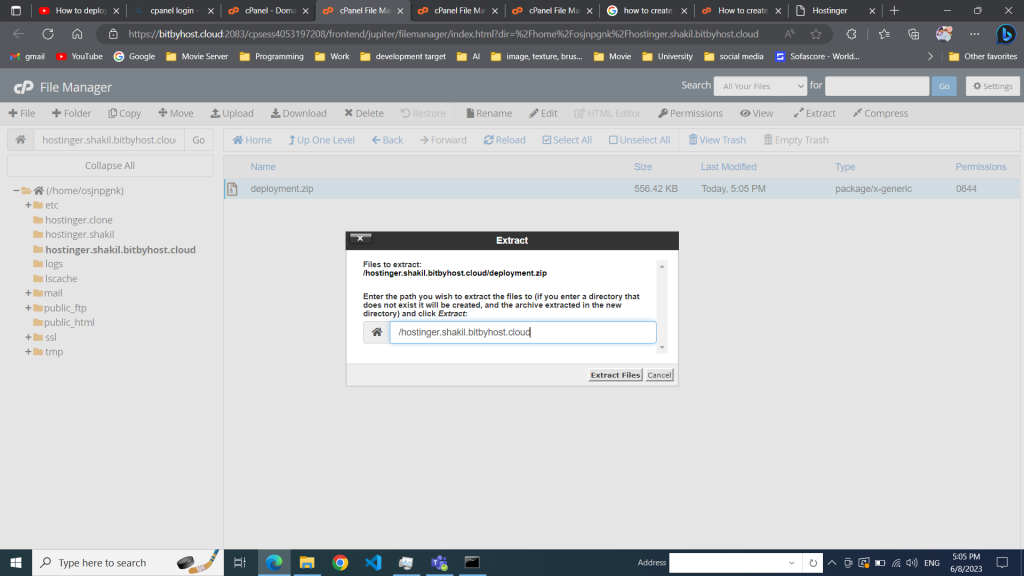
Now you’ll see extracted folder file here.
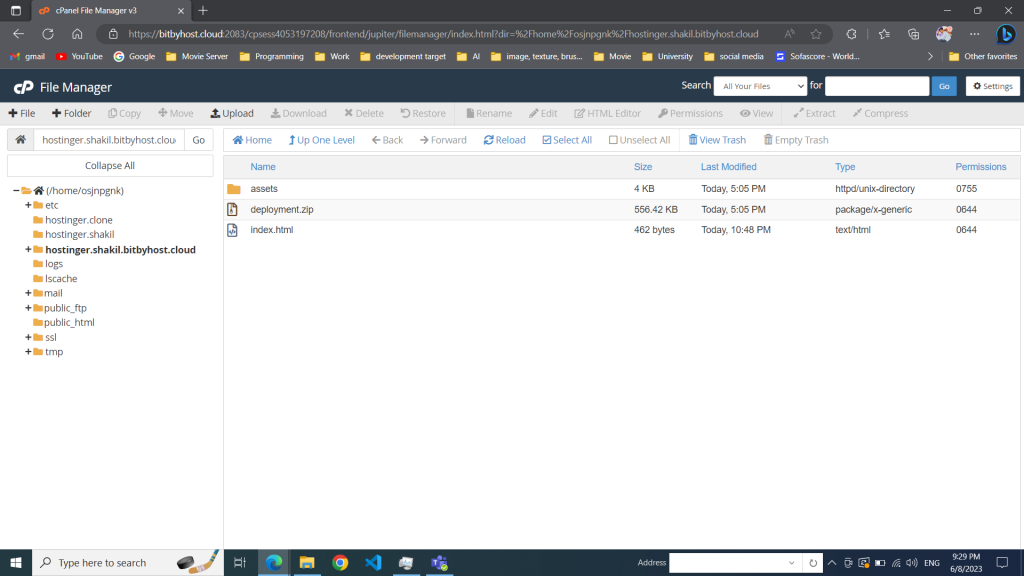
Once the upload is complete, ensure that the subdomain folder contains the “index.html” file and other assets.
Step 4: Access Your Deployed React.js App
Congratulations! Your React.js app is now deployed on cPanel shared hosting. To access it, simply open your web browser and visit your subdomain URL (e.g., react.yourdomain.com). You should see your React app running smoothly.
Conclusion:
In this tutorial, we learned how to deploy a React.js app on cPanel shared hosting by creating a production build, uploading the files updating the “index.html” file. While cPanel is primarily designed for static websites, with a few modifications, you can successfully host a React.js app. Now you can showcase your amazing React projects to the world using the convenience of shared hosting. Happy coding!


